Make Your Own Pipe Chimes
![]()

(*) The distance the hole is from the top (where the chime is held) isn’t super critical but if drilled at the listed distance it can help improve your chime sound as it allows for maximum free vibration based on the frequency of that note.
Below are a set of simple instructions to make 23 pipes (#0-#22). You can easily get up to 23 pipe chimes out of the materials specified below with a little optimization on which pipes are cut on each 10′ stick of pipe. Plan on taking up to 5-10 hours to make your own set.
Tip: Being as accurate as you can while marking your measurements and cutting your pipe chimes will help keep your set sounding in tune. Keep in mind this is not a professional set and even the wall thickness of the conduit varies slightly so you might hear a few notes that are slightly off.
Materials:
- 1/2” standard steel electrical conduit (outside diameter = 11/16”), you’ll need a quantity of two 10’ pipes to get pipes 0-22
- Something to hold chimes: string, ribbon, leather cord, boondoggle, etc.
Tools:
- Drill
- Drill bit (size depends on how you wish to hold the chimes)
- Pipe cutter ($10-$20)
- File/sandpaper for smoothing edges
- Tape measure or ruler
- Free printable pipe chime labels
Instructions:
- Use the two 10′ pipes to cut out the pipes you’d like to make. Cutting errors of more than 1/16″ of an inch may effect the pitch of each pipe.
- Using a 1/8″ drip bit, carefully drill a hole all the way through the pipe at the indicated distance from the top of the pipe.
- With a metal file, clean up all burrs accessible on the outside and inside of the pipe.
- Mark each pipe with the correct pipe number.
- String each pipe with the material that you have choose to hold them with.
Be sure to check out our pipe chime playing tips and how to play handheld pipe chimes pages for more information on how to best use your set.
![]()
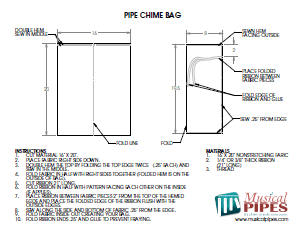
Make Your Own Pipe Chime Bag
 Making a pipe chime carrying or storage bag is simple and easy to do. Only a small amount of fabric, ribbon and thread is required with no special or complicated stitches and can easily be done on a basic sewing machine with basic sewing knowledge. You can even put your own twist on it and make it truly your own with colorful fabrics, thread, ribbons buttons, etc.
 Having somewhere to store and transport all your pipe chimes is wonderful to have and now you can do it yourself with this custom carrying bag.
If you’d rather purchase a pre-made pipe chime bag, you can pick one up for only $5.
Download these free pipe chime carrying bag instructions.
